Showing posts with label Onion. Show all posts

Sunday, March 18, 2012

A farm in your balcony

You can use any type of container to grow vegetables and herbs. Plastic pouches, old strainers, curd boxes, even unused bathtubs come in handy, writes Vandana Krishnamurthy

Have you ever felt the joy of harvesting tomatoes, brinjals or ladies finger from a container growing in your apartment balcony? It’s actually possible! All you need are a few old containers, some soil, manure and seeds or a sapling. Many vegetables and herbs can be grown in a very small space in your balcony or terrace. Even the smallest verandah, window sill or portico can boast a crop of vegetables or a garden of flowers in containers. 

Planter boxes, old plastic containers, hanging baskets and large flowerpots are just some of the containers that can be used. You can grow just about any vegetable in a container and also save money by growing your own vegetables. Cities that are fast expanding mean that there is very less area for green and open spaces. Gardens and natural areas have been sacrificed to build roads, commercial buildings and apartments. 

Green spaces not only provide us with clean air and recreation, and they also provide a habitat for a large variety of plants, birds and insects. Apart from the biodiversity they also protect the city from absorbing pollutants, preventing soil erosion, absorbing solar radiation, reducing noise pollution and maintaining the health of the urban ecosystem overall. However, the city and this concrete jungle are going nowhere. We need to be innovative to create our own green spaces within our existing system. 

Fun way to raise crops

Container gardening is a simple and fun way to grow edible crops in just about any situation. You can use any type of container. Strong plastic pouches, old strainers, curd boxes, two-litre soft-drink bottles, old airtight plastic boxes that have lost their lids, old trays, even unused bathtubs, the list can be endless. 

Get creative! Apart from these recycled containers, you can also have specific planters and terracotta pots for planting. Any kind of container that is attracting and appealing to you and has a drainage hole on its bottom can be an option. 

To start off, you need a container, plant, soil, manure and some water. Make sure there is enough room for all of these. Provide good drainage for the container by creating a hole at the bottom of the container. Do not stack up the soil around the holes, but place some large old clay pot pieces to allow for easy draining. Be sure to balance the size of your plant and container. Mix the soil with some manure and make it moist with a little water. 

Fill it into the container and place the seeds/saplings. Provide ample water to the plant after planting, without drowning it. Water every day initially and depending on your plants’ need, you can water accordingly. Some people say that container gardening is best for those who do not have the time to attend to their plants.

It will not take so much of time and effort. There are some creative containers called earth boxes and self-watering containers that provide water at all times. Container gardens offer the advantage of changing your garden with every season.

Almost any vegetable that will grow in a typical backyard garden will also do well as a container-grown plant. Vegetables that are ideally suited for growing in containers include tomatoes, capsicum, brinjal, green onions, beans, lettuce, gourds, pumpkin, radishes and parsley. Beans and cucumbers also do well in this type of garden, but they do require considerably more space because of their vining growth habit. Most herbs and leafy vegetables do well in small containers. Vegetables require a little more root space and therefore require larger containers.

The following are some plants that can be grown:

Tomatoes: Tomatoes need tons of sunlight to grow. It would be best to grow them in the sunniest part of your balcony. Bury the roots/seed deep into the soil because they are able to develop roots all along their stem. Autumn is the best time to sow tomatoes and you can harvest it 80-100 days from planting. Gather fruits that are just reaching the ripening stage. Do not leave it till a tiny crack appears at the stalk end, or a softening of skin indicates complete ripeness.

Beans: Green beans are one of the easiest vegetables to grow. They don’t take up a lot of space and require very little maintenance. Pole bean plants need some sort of support structure - like a pole. If you have limited time and garden space, bush beans are probably the way to go. Sowing season is between August and October. Such crops can be harvested in about 45-60 days. During the flowering season, be careful when it comes to watering and drainage of excessive moisture. Flowers generally stop falling after the pods have developed. Watering is advised on a very dry day, because the crop is susceptible to water logging.

Chilies: This is the most rewarding plant of the vegetable family. The best time to harvest chilies is before the monsoon, which can be harvested after about two months. Hot peppers are usually harvested at the red-ripe stage; but green chilies are also required for many south Indian recipes. Plastic or rubber gloves are helpful when picking or handling hot chilies.

Onions: Onions are one of the most popular vegetables for growing in home gardens. Onions can be planted from seed or from sets (partly grown onion bulbs). When the plant is fully grown, bend over each bunch of foliage to cut off the supply of sap from the leaves to the bulb. After a week or ten days the crop may be harvested.

These are just few of the many plants that can be grown in limited balcony spaces. You can grow your own mini pharmacy of medicinal herbs like amrutha balli (tinospora cordifolia), curry leaves, basale soppu (basella alba), garlic, ginger, mint, etc. 

Many people have adopted organic terrace gardening in Bangalore, a movement pioneered by Vishwanath. He began this initiative in 1992 by providing training to residents in their own locality and supplying the needed inputs like seeds, manure, plant protection materials, implements, containers, etc. 

There are many organisations in Bangalore involved in plants and gardening. For example, Institute of Ayurveda and Integrative Medicine (IAIM) in Yelahanka, Bangalore has a large nursery with all kinds of medicinal plants that can be home grown.

Monday, February 27, 2012

A farm in your balcony

You can use any type of container to grow vegetables and herbs. Plastic pouches, old strainers, curd boxes, even unused bathtubs come in handy, writes Vandana Krishnamurthy

Have you ever felt the joy of harvesting tomatoes, brinjals or ladies finger from a container growing in your apartment balcony? It’s actually possible! All you need are a few old containers, some soil, manure and seeds or a sapling. Many vegetables and herbs can be grown in a very small space in your balcony or terrace. Even the smallest verandah, window sill or portico can boast a crop of vegetables or a garden of flowers in containers. 

Planter boxes, old plastic containers, hanging baskets and large flowerpots are just some of the containers that can be used. You can grow just about any vegetable in a container and also save money by growing your own vegetables. Cities that are fast expanding mean that there is very less area for green and open spaces. Gardens and natural areas have been sacrificed to build roads, commercial buildings and apartments. 

Green spaces not only provide us with clean air and recreation, and they also provide a habitat for a large variety of plants, birds and insects. Apart from the biodiversity they also protect the city from absorbing pollutants, preventing soil erosion, absorbing solar radiation, reducing noise pollution and maintaining the health of the urban ecosystem overall. However, the city and this concrete jungle are going nowhere. We need to be innovative to create our own green spaces within our existing system. 

Fun way to raise crops

Container gardening is a simple and fun way to grow edible crops in just about any situation. You can use any type of container. Strong plastic pouches, old strainers, curd boxes, two-litre soft-drink bottles, old airtight plastic boxes that have lost their lids, old trays, even unused bathtubs, the list can be endless. 

Get creative! Apart from these recycled containers, you can also have specific planters and terracotta pots for planting. Any kind of container that is attracting and appealing to you and has a drainage hole on its bottom can be an option. 

To start off, you need a container, plant, soil, manure and some water. Make sure there is enough room for all of these. Provide good drainage for the container by creating a hole at the bottom of the container. Do not stack up the soil around the holes, but place some large old clay pot pieces to allow for easy draining. Be sure to balance the size of your plant and container. Mix the soil with some manure and make it moist with a little water. 

Fill it into the container and place the seeds/saplings. Provide ample water to the plant after planting, without drowning it. Water every day initially and depending on your plants’ need, you can water accordingly. Some people say that container gardening is best for those who do not have the time to attend to their plants.

It will not take so much of time and effort. There are some creative containers called earth boxes and self-watering containers that provide water at all times. Container gardens offer the advantage of changing your garden with every season.

Almost any vegetable that will grow in a typical backyard garden will also do well as a container-grown plant. Vegetables that are ideally suited for growing in containers include tomatoes, capsicum, brinjal, green onions, beans, lettuce, gourds, pumpkin, radishes and parsley. Beans and cucumbers also do well in this type of garden, but they do require considerably more space because of their vining growth habit. Most herbs and leafy vegetables do well in small containers. Vegetables require a little more root space and therefore require larger containers.

The following are some plants that can be grown:

Tomatoes: Tomatoes need tons of sunlight to grow. It would be best to grow them in the sunniest part of your balcony. Bury the roots/seed deep into the soil because they are able to develop roots all along their stem. Autumn is the best time to sow tomatoes and you can harvest it 80-100 days from planting. Gather fruits that are just reaching the ripening stage. Do not leave it till a tiny crack appears at the stalk end, or a softening of skin indicates complete ripeness.

Beans: Green beans are one of the easiest vegetables to grow. They don’t take up a lot of space and require very little maintenance. Pole bean plants need some sort of support structure - like a pole. If you have limited time and garden space, bush beans are probably the way to go. Sowing season is between August and October. Such crops can be harvested in about 45-60 days. During the flowering season, be careful when it comes to watering and drainage of excessive moisture. Flowers generally stop falling after the pods have developed. Watering is advised on a very dry day, because the crop is susceptible to water logging.

Chilies: This is the most rewarding plant of the vegetable family. The best time to harvest chilies is before the monsoon, which can be harvested after about two months. Hot peppers are usually harvested at the red-ripe stage; but green chilies are also required for many south Indian recipes. Plastic or rubber gloves are helpful when picking or handling hot chilies.

Onions: Onions are one of the most popular vegetables for growing in home gardens. Onions can be planted from seed or from sets (partly grown onion bulbs). When the plant is fully grown, bend over each bunch of foliage to cut off the supply of sap from the leaves to the bulb. After a week or ten days the crop may be harvested.

These are just few of the many plants that can be grown in limited balcony spaces. You can grow your own mini pharmacy of medicinal herbs like amrutha balli (tinospora cordifolia), curry leaves, basale soppu (basella alba), garlic, ginger, mint, etc. 

Many people have adopted organic terrace gardening in Bangalore, a movement pioneered by Vishwanath. He began this initiative in 1992 by providing training to residents in their own locality and supplying the needed inputs like seeds, manure, plant protection materials, implements, containers, etc. 

There are many organisations in Bangalore involved in plants and gardening. For example, Institute of Ayurveda and Integrative Medicine (IAIM) in Yelahanka, Bangalore has a large nursery with all kinds of medicinal plants that can be home grown.

Deccan Herald

Onion - II

Onion Farming Business

Harvested Onions in Farm
Onion farming is a good idea if you have unused land in your backyard. Perhaps, this crop does not attract the attention of many people yet it supports million lives specifically children who help in the planting process.

There are some places in the world where locals depend their living in onion farming.

For many years, onion farming became popular across Yemen. However, due to lack of interest of many farmers the industry declines. Fortunately, nowadays lots of people engage in backyard gardening and they find growing onions as their choice. There are two categories of onion such as the short day onions and the long day onions. These two onions differ on the growing period. Likewise, when buying for onion varieties that you will grow you can choose from bulb onions and the perennial onions.

How to Plant Onions?

Onions can be grown from seeds, sets and transplant. When you choose to grow onions from seeds you should plant the seeds ½ inches apart and 3/8 inch deep. The rows should be 15 inches apart. On the other hand, the bulb onions are perfect to grow from transplant. The planting process is merely the same with growing from seeds. In like manner, the bulb onions can be easily grown by planting sets. Planting sets can be can be grown closely together but needs to be thin out by getting the green onions and the others will grow into bulbs.

Maintaining onion Plants

Farming onion plants requires lot of water as they initially grow. However, as the plants mature, thy do not need much of water. Sometimes you can just depend on rainwater but make sure that the plants absorb the right amount every 5-7 days. Mulching can help reduce the weeds and at the same time maintain the soil moisture level. Keep in mind to weed out once the onions start to grow so that the weeds will not absorb the soil nutrients needed by the onions. However, you should be careful when weeding and ensure not to disturb the roots of the onions. In addition, you may not use fertilizer if you employ quality compost in the soil before planting the onions. Instead, you should use root builder like the natural mycorrhizal fungi. It helps the roots in absorbing water as well as soil nutrients by attaching to the roots. In this way, you can save the organic fertilizer for other crops.

Harvesting Onions

Bulb onions can be harvested within three months. When the plants start to yellow then it is the right time to harvest the bulb onions. Ripening process can be induced by breaking the tops of the onions. It is best to harvest the onions prior of producing flower stalks. On the other hand, you can only harvest the green onion as soon as it reaches 5 inches tall. The flavor depends on how taller they get. This means that if you want a strong flavor onion you should let it grow taller.

FAQ

Q. What is the best time for planting onion?
A. Usually onion seeds are planted in mid-october.

Q. What temperature is best suited for onion farming?
A. Temperature should be 15-25 degree celcius or 60-80 F. Onion needs uniform moisture throughout the growing season. More likely the furrow irrigation is used for onion planting.

Q. What are the various onion plant diseases?
A. Here are the common diseases that you need to aware of like botrytis leaf blight, purple blotch, pink root, smudge and several basal rots.

Monday, February 20, 2012

Onion - I

Instructions on How To Grow
Onions for Great Crops


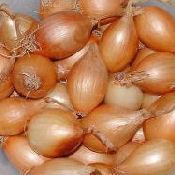
An easy to grow and store vegetable - makes it essential to learn how to grow onions. Few vegetables have more uses in the kitchen than onions, which means they are constantly in demand.

Growing Onions


Fortunately with the introduction of the Japanese varieties the June-July gap can now be filled... so learning how to produce an all-year-round supply comes easy with your newly acquired knowledge of how to grow onions.
Planting onions successfully has never been easier. Growing onions from 'sets' takes away nearly all the risk. The advantages of growing from onion sets are...
  • they need less skill and soil fertility
  • How to Grow Onions
  • they are quick to mature so suit northern areas
  • they are not attacked by onion fly or mildew
  • There is a slight increase in the risk of 'bolting' (running to seed) when using onion sets but modern varieties are much less prone to this.

    Don't buy sets that are more than 20mm(0.75") across and make sure you buy 'heat treated' onion sets - this treatment kills the flower embryo and helps prevent bolting.


Three ways that experience has taught vegetable gardeners how to grow onions are:
...Maincrop onion seed or sets - sown or planted in late February to early April; depending on your garden's location.
...Japanese variety of onion seed or sets - sown or planted outside in early September for pulling in late June.
...Salad or Spring Onions - sown March to July for pulling from June to October. Sown in August you will get a crop March to May.
Follow the planting directions below for each type and you will be successful, your knowledge on how to grow onions will be complete. Then as you gain experience through planting and experimenting you will discover how to best utilise your little patch of ground to get the maximum amount out.


How to Grow Onions - Soil Details


If you are sowing maincrop onion seed then prepare your onion bed on an open sunny site that has good drainage. Most exhibitors grow onions from seed and understand that good soil preparation is essential before planting their onions. They prefer to grow them in a permanent bed in order to build up the soil fertility - knowing how to grow onions is second nature to these guys... but they had to learn first!
But for folk like you and me who want to know how to grow onions so we can just eat the stuff - How to Grow Onionsthen planting onions in this way is not necessary... it can even be harmful! There is the danger of building up diseases as well as soil fertility. Let the onion bed rotate with the rest of the vegetable garden.
So where were we... oh yes, planting maincrop onion seed. Dig the bed in autumn to let the ground settle and allow the frosts to break down the soil clods - onion seeds will require a fine tilth to be sown into and the frosts will do a great job of this.
Dig in plenty of well rotted manure or, add lime if soil is acid, onions like a pH of between 6 and 7... don't become too obsessed by these values, it is helpful in knowing how to grow onions but needs to be included with all the other necessary info - a soil that is pretty neutral (6 - 7.5) will serve you fine.
It is a good idea though to know the approximate pH value of you soil by purchasing a testing kit.
A good tip when learning how to grow onions is to pick a dry day a few weeks before sowing time and rake down the soil to a fine tilth, at the same time rake in a general fertiliser like Growmore.
Onions like a firm bed so tread over the area you have just raked... remember if the soil starts sticking to your footwear in large sticky lumps then it is still too wet, wait for another day.
Once you have trodden over the bed where the onions are going to grow rake it over again into a fine even tilth.
Well that's your bed prepared... but you have no time to lay on it, let's get on with the planting.


How to Grow Onions - Sowing Maincrop Onion Seeds


Onion Seeds Germinating
Onion Seedlings
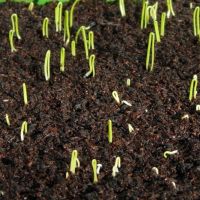
Sow maincrop onion seeds as soon as your soil allows you to - late February to early April for an August or September crop. Sow the onion seeds very thinly into drills 13mm(1/2") deep, in rows 23cm(9") apart. Carefully cover the onion seed with soil and gently water in. Germination will take approximately 21 days.
Thin out your onion seedlings when they have pushed through the soil and are standing vertical to about 25mm(1")-50mm(2") apart and then again later to 10cm(4") apart. Lift the thinnings carefully... make sure the soil is moist. It's important to clear the thinnings away from the onion bed so not to attract the onion fly.
Gardening experts have learnt from experience how to grow onions for the big competition bulbs which win shows. Maincrop onion seed are sown under glass in January for an earlier crop and for growing those exhibition bulbs.
Transplant them in rows 10cm(4") apart and rows 23cm(9") apart. Transplant the onion seedling firmly - ensuring the root falls into the bottom of the hole and is not gathered up around the onion bulb area... the base of the onion should be 13mm(1/2") deep.


At A Glance

Expected germination time


20 days
Life expectancy of stored seed


1-2 years
Approx. time between sowing and harvesting


43-46 weeks for August sown varities
20-22 weeks for spring sown varieties
Cultivation facts


Easy to cultivate if good seed bed is prepared


How to Grow Onions - Planting Onion Sets


Learning how to grow onions from seed can be difficult in some areas because of the short growing season e.g. the colder areas of northern Britain. The alternative is toknow how to grow onions from sets. These are small immature onions raised by specialist growers from seed one year and planted by gardeners the next spring to grow into mature plants.
Whilst it's true all onion plants require a good, free draining soil, How to Grow Onionsonion sets are not as demanding - this is especially convenient for those of us who are new to gardening and are just learning how to grow onions.
Prepare the onion bed as for onion seeds above but they don't need the same high organic content as seeds or the fine tilth for sowing.
When you purchase your bag of onion sets empty them into a tray if you are not planting immediately and keep in a cool, light place to prevent premature sprouting. Cut off any excess dead growth from the growing tip so this doesn't become a handle for birds to pull them out of the ground.
Plant out your onion sets mid March to mid April... 10cm(4") apart in the row and between-row distances of 23cm(9"). Make a small hole in the soil with a trowel then pop you onion set in so the growing tip is just below the surface and firm the soil around it. Water in.


How to Grow Onions - Sowing/Planting Japanese Onion Seeds and Sets


Japanese onions are very similar in taste and appearance to maincrop varieties but they do not store well... but that's ok because you will not need to keep them very long before your maincrop onion plants are harvested.
Apply a general fertiliser like Growmore two weeks before sowing your Japanese onion seed in mid August... just follow the instructions above for 'maincrop onion seed sowing and thinning distances.
It is preferable to sow Japanese onion sets for all the reasons stated previously. Apply a general fertiliser before planting. Plant out from early September to mid November... follow the planting distances above.
Come March apply a general fertiliser and if the ground is dry begin watering to help swell the bulbs, ease off the watering as summer approaches and the bulbs begin to ripen.


How to Grow Onions - Sowing Spring (Salad) Onion Seeds


How to Grow Onions Spring onions should be sown from March to July in short rows 13mm(1/2") deep and 10cm(4") between rows. Thin them out to 25mm(1") if you want more developed salad onions but it is not necessary.
Sowings should be repeated every three weeks so that you have a supply for your salads throughout June to October. Sow a few rows in August for eating in March/May.
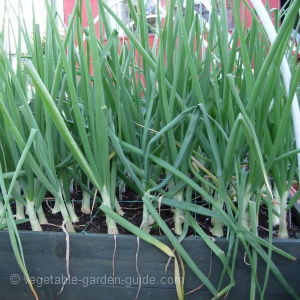
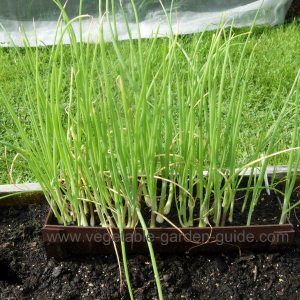
But... there`s always a but :0) - if you are very short of space grow some in a container filled with potting compost.

The picture on the right shows how I successfully grew spring onions in a piece of guttering. If I wanted to, I could have slid these spring onions out as young seedlings, along with its compost into rows in the open ground.
It`s amazing what you can use when you play around a bit... with the veg gardening I mean. Learning how to grow onions the conventional way is only the first step.


How to Grow Onions - Caring for Your Plants


Below are important points to remember so that you know how to grow onions of maximum yield.
Keep weeds down as to much growth will affect the quality of the crop. Preferably weed by hand as onions hate having their roots disturbed.
Feed occasionally with a liquid fertiliser and water the onion plants if the weather is dry... but not otherwise. Apply a mulch to keep weeds down and conserve moisture; don't cover the swelling bulbs though, as they need to be exposed to the sun.
Cut off any flower stems that appear - you want all the plants energy going into swelling the bulb and not setting seed. Stop watering once the onions have swollen and begin to ripen.


How to Grow Onions - Pest Control


There is nothing more demorilising in vegetable gardening than having taken the trouble to learn how to grow onions and other veg then have some nasty little pest or disease come along and destroy your efforts - it happens, but we need to minimise the attacks by operating good practices and husbandry and to know who the enemy is.
The four worst offenders you are likely to come across when growing onions are:
Onion Fly - maincrop onions from spring sowings are the most likely to be affected... around May/June time but problems can occur right up to September. Onions grown from sets are less vulnerable - these are always the best option if you just intend to eat and not show your onion plants.
How to Grow Onions The onion fly resembles the house fly and lays its eggs in the soil near to the onion plants. When the grubs emerge they burrow into the onion bulbs and eat them away.
Signs of attack are yellow drooping leaves. Pull up infected plants and burn them or ensure they are destroyed. Do not leave thinnings hanging around as these, disturbed roots and damaged leaves put the onion fly onto the scent of their prey.
There are chemical deterrents available so visit your local garden centre and ask their advice.
Eelworm - look like minute transparent eels but are invisible to the naked eye. An infected bulb could contain millions of these pests. If they are present in the soil which you plant your onions into (Chickweed is a host of this eelworm - important to keep a weed free onion bed) then secretions from the onion plants roots cause the cysts to come to life... the eelworms will then burrow into the onion bulb and up into the stem.
The foliage and stems then become distorted, the bulbs swollen and soft. Burn all affected plants and do not grow onions on that piece of ground for five years - or beans, strawberries and peas as these are affected too.
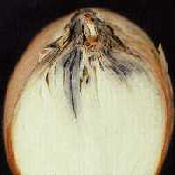
How to Grow Onions Neck Rot - grey mould appears near the neck of onions that are being stored... the bulbs become soft and rot. There is a greater risk of the fungus developing if the onion bulbs have been damaged - whilst hoeing for example, or have not been allowed to properly dry out after harvesting and are then stored in a damp and poorly ventilated area.
You are asking for trouble if you try and store onions with green, fleshy necks.
There is no treatment so inspect your stored onions frequently and remove any that are rotting immediately.
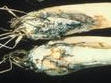
How to Grow Onions White Rot - hot, dry summers may encourage this growth on your onions. The leaves turn yellow, the bulbs rot and the base of the onion is covered with a growth of whitish/grey fungus with round black bodies appearing within the fungus.
There is no treatment except to lift and burn diseased plants. White rot is a serious disease so don't grow onions on that piece of ground for eight years.


How to Grow Onions - Harvesting


How to Grow Onions Harvest maincrop varieties August to September Harvest Japanese varieties June to July Harvest Spring onion varieties March to October.
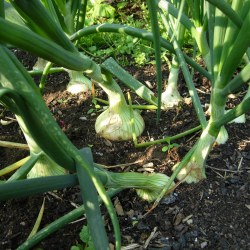
The onion bulb is mature when the foliage turns yellow and tips over - leave for another couple of weeks before lifting.
Choose a dry day. If the onion bulbs are ripe they can be pulled by hand but easing them out of the soil carefully with a gardening fork will ensure no damage occurs.
If the weather is dry and settled they can be laid on the ground on some sacking or if possible raised up a 25-30cm(10-12") onto wire netting nailed onto four posts creating a cradle. They can then be left in the garden to dry out.
If the weather is wet lay the onion plants in trays or on sacking indoors somewhere, where it is well ventilated.
Depending on the temperature and size of your onion bulbs - I'm sure they will be good healthy specimens by now - it will take approximately 2-4 weeks for them to dry out and cure.
A good tip for knowing how to grow onions is to inspect your onion bulbs carefully and all soft, spotted and thick necked onions should be separated for your current cooking requirements. Store the rest.
As already stated Japanese onions are not good storers but you will not be keeping these as long as your maincrop onions.
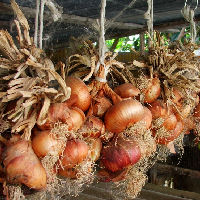
The most convenient way to store your onions is to create an onion rope. Just take a stout piece string or twine and tie the two ends together to form a loop. Hang it from a support so it dangles then proceed to tie the onions into it by plaiting the dried foliage around the string.
There is something very satisfying about the result. You can also use trays, net bags or even a pair of ladies tights... get permission first, mind you.
Knowing how to grow onions doesn't just end with the planting and havesting. You want the results of your hard work to last for some time so remember the rules for correct storage:
Dry onion bulbs thoroughly. Store only undamaged and hard onion bulbs. Only store onions in a cool well ventilated area.
The spring onions should be pulled when they have grown to approximately 13-25mm(1/2-1") across.
Well it's up to you now, all the information on how to grow onions is at your finger tips - no excuses now just get out into your garden and start preparing and... bon appetite!
(Source) 
 

Pages

Categories

Vegetables (13) Goat (9) Tomato (8) Cattle and Livestock (6) Gardening (6) Hydroponics (6) Advise and Tips (5) Fruit (5) India (5) Organic Farming (5) Poultry (5) Agriculture (4) Onion (4) Cow (3) Goat Farming (3) Manure and Composting (3) Organic Matter (3) Poultry Farming (3) Seeds (3) Turmeric (3) USA (3) Urban Agriculture (3) Bitter Gourd or Bitter Melon (Karela) (2) Buffalo (2) Bulls and Oxen (2) Dairy Farm (2) Diseases (2) Fruit Farm (2) Green Chili (2) Integrated Farming (2) Manure and Compost (2) Mushroom (2) Nutrition (2) Papaya (2) Rice (2) Saffron (2) Small Scale Farming (2) Success Stories (2) Zaffron (2) Aloe Vera (1) Animal Health (1) Asparagus (1) Avocado (1) Banana (1) Beef (1) Beekeeping (1) Bio Gas (1) Biofuel (1) Biotechnology (1) Breeds (1) Building and Construction (1) Business Plan (1) CO4 Hybrid Napier grass (1) Calf (1) Cherries and Berries (1) Chicken (1) Chicken Coop (1) Coconut (1) Coconut water (1) Cooperative (1) Featured (1) Fertilizer (1) Food (1) Foot and Mouth Disease (1) Garden (1) Germination (1) Ginger (1) Grains (1) Green (1) Green Manure (1) Health Benefits (1) Kerala farmers (1) Life (1) Machinery (1) Milk (1) Natural Rubber (1) Neem (1) Okra (1) Palm wine (1) Pest Management (1) Philippines (1) Pomegranate (1) Production Figures (1) Season and Varieties (1) Sheep (1) Smart Farming (1) Solar and Wind Energy (1) Storage (1) Strawberry (1) Supply Chain (1) Sustainable Agriculture (1) Sustainable and Renewable Energy (1) Sweet Pea (1) Synthetic vs. Organic Fertilizers (1) Toddy (1) Vaccination (1) agricultural (1) container gardening (1) insurance (1) organic gardening (1) pet care (1) pets (1) plans and schemes (1) vegetable gardening (1)

Our Courtesy

http://pakagri.blogspot.com/

Ads Banner

Followers

AgricultureCreated by Praveen with Copyright © 2009 BeMagazine Blogger Template is Designed by Blogger Template